How to Create a Powerful Website Using SharePoint

SharePoint is a web-based collaboration platform that allows you to create powerful websites, each individual or organization can use SharePoint for their specific needs. You can use it to share your information with your external stakeholders through a website. You can also use it to store documents and as a document management system.
Popular Web Parts That Can Help You Create Your Page Using SharePoint
- Button
- Image
- Divider
- Code Snippet
- Call-to-action
- Document Library
- Embed
SharePoint is not a desktop application installed on your computer. It connects from a browser online, and it can be accessed from a personal computer, tablet or mobile device and is stored on your server.
What is the Use of SharePoint?
The most useful feature of SharePoint is that it allows you to collaborate and share information. You can create workflows and save your organization’s time. You can also use SharePoint as a secure place to store, share, organize and access your information from any device. You can create websites and pages using this platform. All you need to start working on SharePoint is a web browser, such as Chrome, Internet Explorer, Microsoft Edge, and Firefox.
Become an eLearning Champion!
How to Use SharePoint?
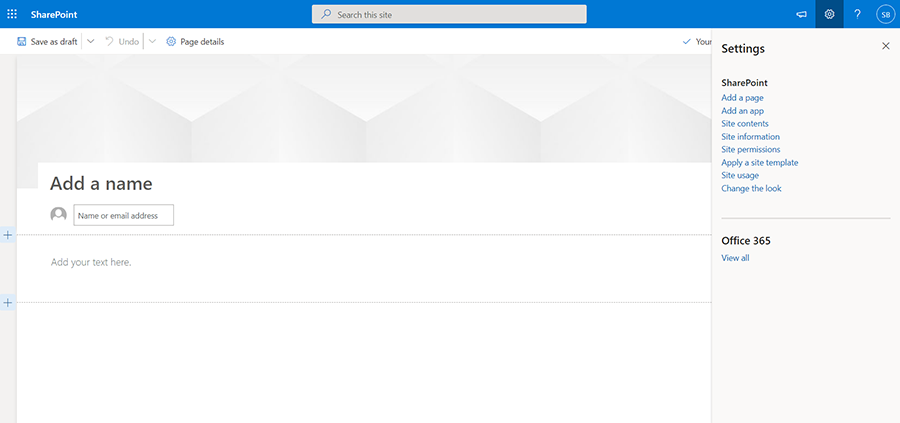
You first need to go to the SharePoint website to start creating your page. On the SharePoint homepage, select “Add a page” from the settings on the top right corner.

From the picture above you can see that you will land on “Add a name” after selecting “Add a page” from the settings of the SharePoint homepage.
You can add web parts to your page using SharePoint, and it is an effective and useful way to present your content. Web parts are the building blocks of your page. Let’s explore the different types of web parts to learn more about them.
Web Parts Components
Start by hovering your mouse below the title area, where you see “Add a name”. You should be able to see a line with a circle in the center and a + in the middle of the circle.
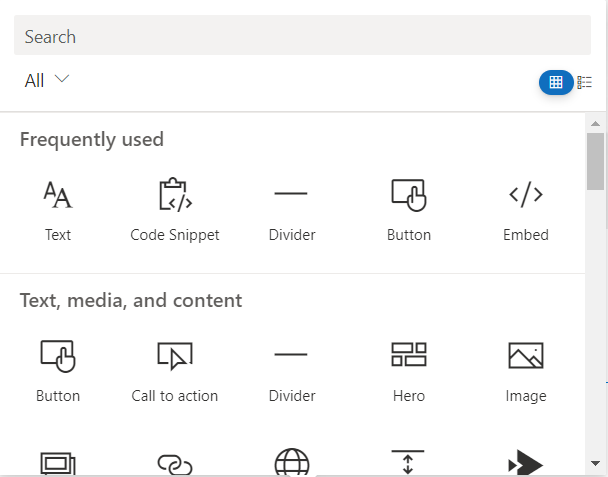
Click the + sign and you will see a dropdown box from which you can select and add content such as text, videos, images, documents, and FAQs to name a few.

Once you have opened this dropdown box, you can choose the list view or grid view from the top right corner. You can also sort and filter them by category from the top left corner marked “All”.
How to Select the Right Rapid Authoring Tool
How to Create Your Page Using SharePoint
Find out more about how you can create your page using SharePoint using some popular web parts.
1. Button
The Button web part can help you create a button for your page and design your own label on it. You can also add a link to another page of your choice.
You can click the “Button” icon from the list of web parts, and you can create your button by selecting the “Edit web part” icon from the toolbar on the left. Enter your label in the “Label box” and enter your link in the “Link box” provided on the right side of the screen. You are also given alignment options to align your Button web part to the left, right or center of your page.
2. Image
You can click the “Image” icon from the dropdown list of web parts, and insert an image that is stored in your computer, on the web, or in your site. You can crop and resize it and replace the existing one with your own image.
You can also add a link and write something over your image.
3. Divider
The Divider web part will help you to separate your page into columns and sections.
Select the “Divider” web part icon from the dropdown list. Using this web part, you can choose how your page divider will look by adjusting the length of the divider from 20%, or the shortest, to 100%, which is the longest possible length.
When you drag the slider, the divider length will change according to your selection. You can also adjust the weight of the divider from 1, or the thinnest, to 6 or the thickest possible weight.
4. Code Snippet
The Code Snippet web part allows you to display a code. You have the option to select a coding language. You can auto correct any code syntax errors. Select Code Snippet from the dropdown list of web parts. When adding your code, you can also number your lines and choose a light and dark theme.
5. Call to Action
This web part enables you to create a button with a call to action. Choose the call-to-action web part from the dropdown list of web parts.
You can add a background image, label, and link by selecting the edit web part icon from the toolbar on the top of the call-to-action button. The call-to-action button is aligned to left by default, but you can change it to the right or center of your screen.
6. Document Library
When you use select the Document Library web part from the dropdown list, you are given the opportunity to display a specific file or folder that is saved to your SharePoint page.
You can add, edit, and view files from the Internet but they must have appropriate permissions. You can also rename, download, and delete files. You can display the documents in detail using the list view or the tile view.
You can also sort, filter or group your files when using this document library web part.
7. Embed
You can display content from sites that allow the embed function such as YouTube or Bing maps. You need to copy and paste embedded content from your selected website into the box named website address or embed the code on the right side of your screen.
Rapid eLearning and the 4 Rs – The Answer to Disruptive Training!
Conclusion
That was about using the versatile SharePoint to create your own website. As a modern training manager, are you also looking forward to designing engaging eLearning courses? Here’s an eBook that walks you through practical tips put together by experienced L&D professionals. It guides you with more information on how you can implement eLearning courses quickly and effectively.


