Captivate 9 Is in The Store, What’s New – Part 1

Of the many rapid authoring tools available in the market today, Adobe Captivate is the tool of my choice. I have been using this tool to design multimedia learning courses for the past three years. Recently, Adobe has come up with its latest version – Captivate 9. Compared to the earlier version, the new version has some advanced features that can make course development easier and faster.
→ Download eBook Now: Rapid eLearning Authoring Tools
Let’s take a look at the features that have been upgraded as well as newly added in Captivate 9.
| Upgraded Features | New Features |
| Responsive | From Adobe Captivate Draft |
| Themes | Assets |
| Shapes | Knowledge Check Slide |
| Effects | State |
| Actions | |
| Learning Interaction | |
| SVG characters | |
| SCORM Preview | |
| Publish |
First I would like to focus on the features that have been upgraded in the latest version, and In my next blog I will share about the new features.
Upgraded Features:
1. Responsive:
This is the feature that makes Captivate stand out. It enables the development of courses that adjust their interface automatically to the screen size of any device they are accessed on.
Moreover, it helps instructional designers view the course in various screens before it is published.
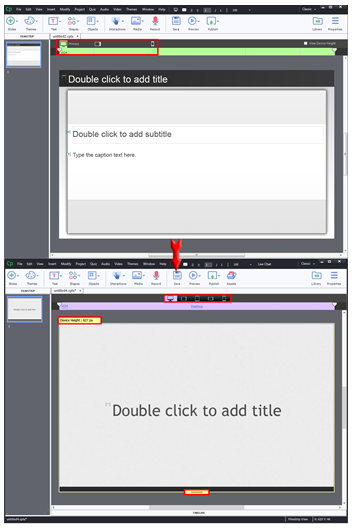
In Captivate 8, the responsive feature had three views i.e., desktop, tablet and mobile. In the latest version, Captivate 9, two dividend views have been added. They are:
- Tablet Landscape View
- Mobile Landscape View
These views help instructional designers view the course in different layouts.
Adding or closing these views is very simple. Just click the ‘+’ icon beside each view to open it and click the ‘x’ icon to close.

As you can see in the screenshot, the two grey draggers can be used to adjust the width of the screen by dragging them either to the left or right. You can also double click near the dragger and manually enter the size as per your requirement.
The table given below shows the maximum and minimum permissible sizes for each view.
| Views | Width Max – Min | Height Max – Min |
| Desktop | 1280 – 420 | 5000 – 100 |
| Tablet Landscape | 1230 – Disable | 5000 – 100 |
| Tablet Portrait | 1180 – 370 | 5000 – 100 |
| Mobile Landscape | 1130 – Disable | 5000 – 100 |
| Mobile Portrait | 1080 – 320 | 5000 – 100 |
If you try to reduce the size of laptop and mobile view beyond the minimum permissible value in the landscape view, the view will disappear.

Rapid eLearning Authoring Tools
Explore the What and the Why of Popular Rapid eLearning Development Tools, and GenAI Tools
- Categories of eLearning Authoring Tools
- Considerations to Choose Your Next Authoring Tool
- Features of Popular Rapid Authoring Tools
- GenAI Tools to Create Content, Graphics, Audio, and Video
In order to adjust the height of all the views, you can go to the Properties panel or click the ‘+’ icon.
Captivate provides the flexibility to increase the height up to 5000px. But you cannot scroll down beyond 1900px.
2. Themes:
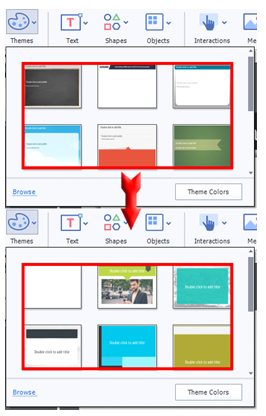
Themes are often used to change the look and feel of an eLearning course. These themes can be customized to give the course a rich look compared to the original default theme. Captivate, provides default themes that can be customized by altering the colors based on your choice. In the latest version of Captivate, new themes have been added.
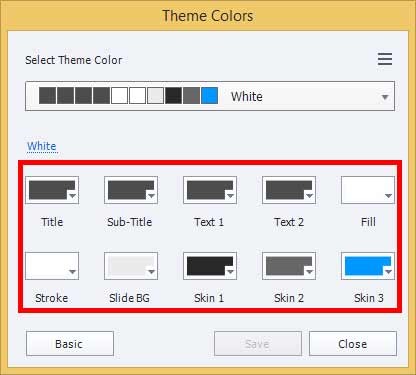
You can change the colors of a theme easily by clicking the ‘Theme Colors’ button.
3. Shapes:
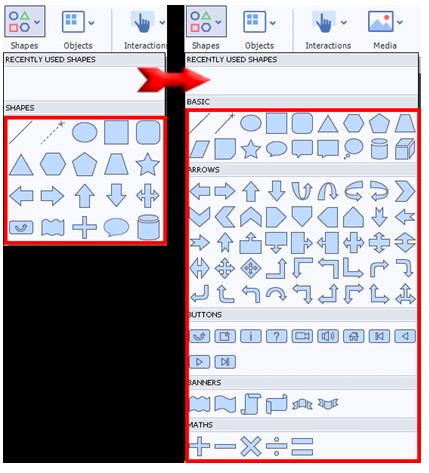
Many new smart shapes have been added in Captivate 9. They are quite similar to those in Captivate 7.
4. Effects:
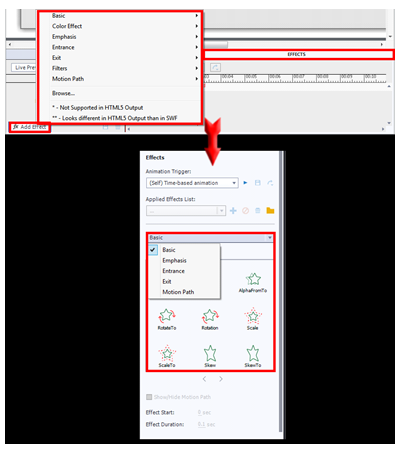
Captivate 9 provides great enhancements in the Effects panel. Also, the Effects panel has now been placed in the Properties panel.
In previous version, it was very difficult to preview any animation/effect. In the latest version, if you select any effect, it automatically plays on the screen before being applied to the object and we can also see the effects in terms of icons for better understanding. We also have a new custom motion path in Captivate 9.
In the previous version, we could not apply effects to a group, but this is possible in Captivate 9.
These are the various features that have been upgraded in the new version of this tool. In my next blog I will share the new features added in this tool.
Have anything to say? Please do share!


