Guides Rule! The Addition of Rulers and Guides to Adobe Captivate 9

Adobe Captivate began as a rather simple screen casting tool that made Flash-based movies. Its current versions include that core plus a whole lot more. With the new version 9.0.1, you gain some really cool features and bug fixes, but one thing that will probably stand out the most is the addition of Guides and Rulers. Guides give you the ability to precisely place your objects on your slides and maintain consistency from one slide to the next. Rulers are used to simply place and measure objects.
The new feature will especially be a big deal for designers who were concerned with the look and feel of their e-learning.Prior to this update, being able to ensure the proper alignment of objects on the screen was a big concern. But the combination of Rulers and Guides will now let designers relax.
Today, I’ll take you through a quick tour of how this feature works, and how you can make use of it.
The first thing we’re going to do is turn Rulers on.
1. Turn on Rulers
Go to the View drop-down menu at the top and select Show Rulers (or you can hit Ctrl + Alt + R if you are more of a keyboard person).
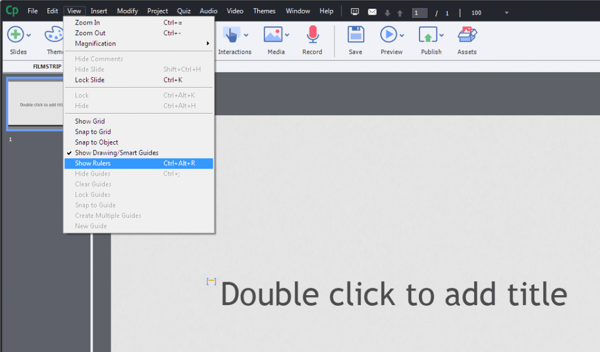
You can now see a Ruler across the top, and along the left hand side of the screen/canvas.
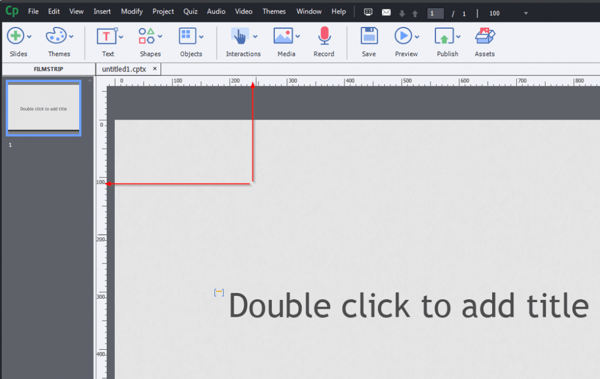
2. Changing the color of the Ruler/Guide
If you would like a particular color for the Ruler, you can tweak its properties in the Preferences menu. If you’re designing a course on a white background, you’d want a darker Guide for easy viewing.
In order to change the Guide color, click the Edit drop-down menu and find Preferences (Shift + F8) all the way at the bottom. This will open the Preferences dialog.
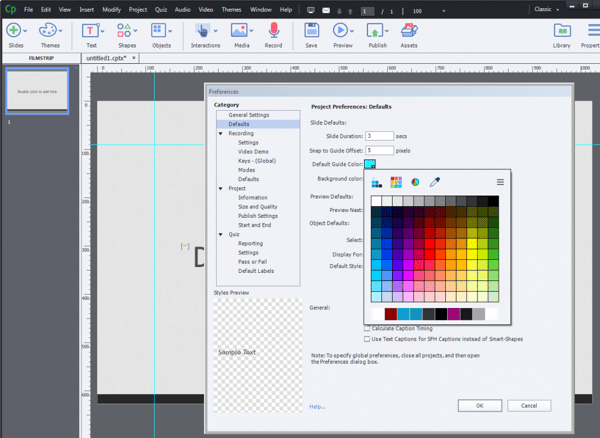
Find Defaults, where you can now choose the Default Guide Color (%) and Default Guide Color (pixels) and the Background color of the screen. And depending on the type of Ruler you’re using, you can have two different colors for them.
3. Rulers for standard and Responsive Design projects
When you’re designing a standard project (also called a blank project), selecting a Ruler will give you pixels across the screen,starting from 0 to all the way up to the size of the e-learning course you’re designing.
In the case of Responsive Design, however, there is a default percentage you will see.
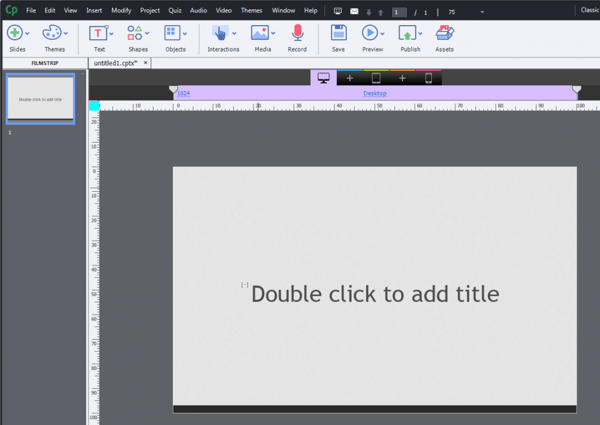
When you right-click on the Ruler, you can change the percentage as per your needs…
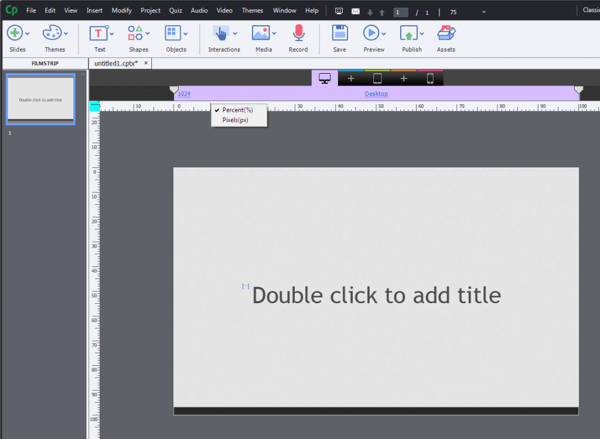
Or switch back to pixels.
![]()
4. Creating Guides
Guides can be useful when you want to have a certain amount of space around the content to accommodate closed captioning and navigation buttons. To create a Guide,simply click on either the top Ruler or the side Ruler and drag it down to the appropriate spots.
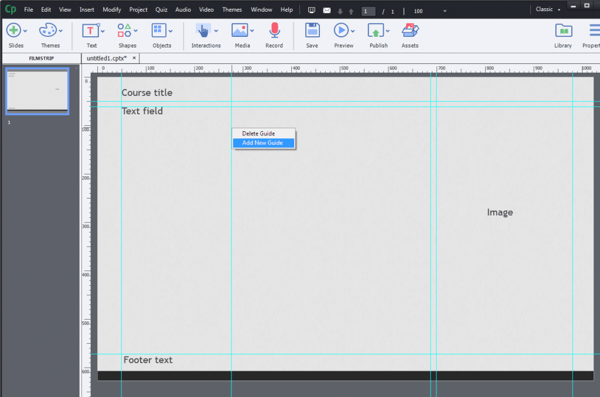
Let’s say you want to create a margin of about 10% on all sides of the screen. To do so, drag the top ruler to create guides at the top and bottom respectively (horizontal guides); similarly, use the side ruler to create the left and right guides (vertical guides).
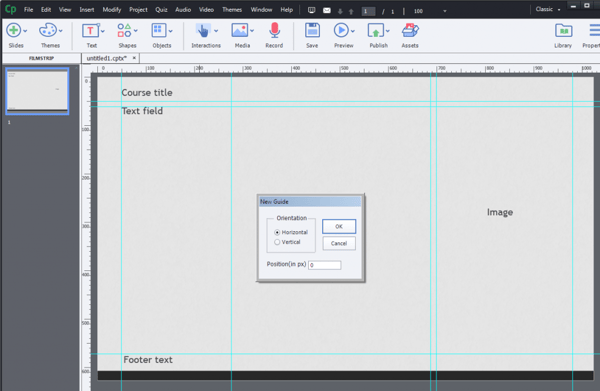
(You can also have a guide on the screen that makes it easy to know where the half-way point of the screen is. This is especially useful when you have a two-column text arrangement on the screen, and you can basically create spaces for your objects.)
This comes in handy when you want to make sure the columns on the screen line up properly.
5. Adding multiple Guides to the screen
Go to View, and click the Create Multiple Guides button. Add the details and hit OK. This will add all the guides to the screen.
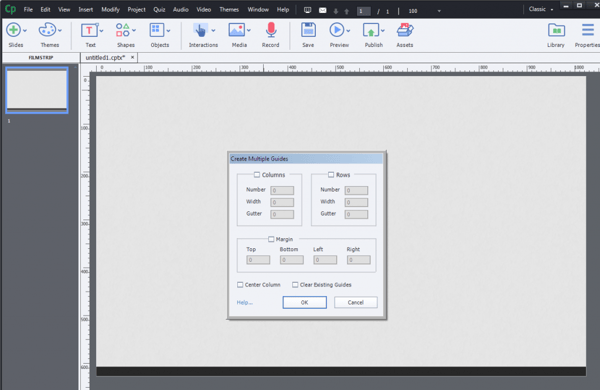
Now, there are a few things you can do to your Guides once you’ve created them.
- Once you have the Guides set the way you want and you wish to add objects, go ahead and lock the Guides by selecting Lock Guides from the View drop-down.
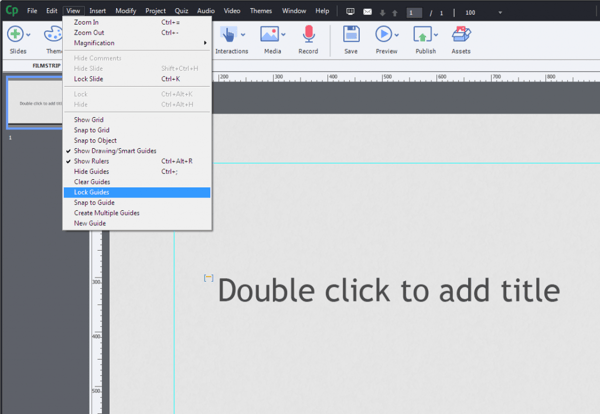
- If you need to see a preview of how your slide/screen looks like, go the Edit drop-down and select Hide Guides to temporarily hide the Guides.
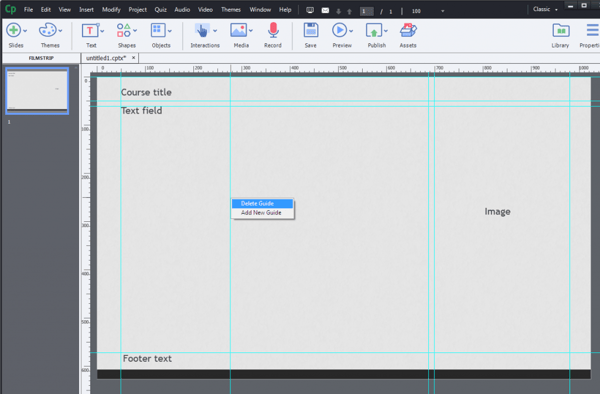
- Once you are done using them, you can wipe them clear by selecting Clear Guides. To clear individual guides, however, hover over the Guide you wish to remove and right-click and select Delete Guide.
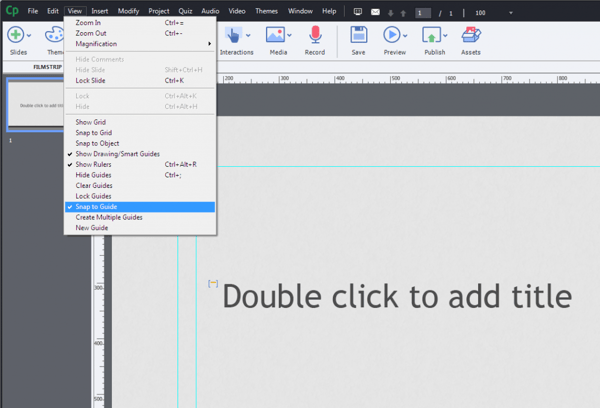
- Another good thing to do with your Guides is, you can snap your objects right into the Guides.Snap a Guide is an option which lets you, well, snap the object right into the Guide when you place it within a range of a certain amount of pixels.The cool thing about this feature is that this will remain constant for all the upcoming slides you have.
Using this feature, you can ensure that your Titles, for example, always remain in the same location (i.e., snapped to the upper part of the Guide, for the above example).
Here is a video of the entire process.
Adobe Captivate is an immensely popular tool amongst the e-learning community. What began as a simple screen casting tool is now one of the most widely used authoring tools, alongside Articulate Storyline and Lectora Inspire. From providing an easy-to-use interface to creating top-notch software simulations for your e-learning, it’s safe to say Adobe Captivate ticks almost all boxes when it comes to efficient e-learning development.
At times, knowing how to use an authoring tool is not enough to create good e-learning. Do you know what else you need? Instructional Design. When Instructional Design and a good authoring tool walk hand-in-hand, you can rest assured your e-learning will be effective.


