A Sneak Peek into Trivantis’ CenarioVR

Quite recently, Trivantis, the developer of the e-learning authoring tool Lectora Inspire, released CenarioVR. This powerful online authoring tool helps in the creation of virtual reality for immersive learning platforms, designed to enhance learner engagement and unlock performance. In this blog post, I will share the best way to learn and explore CenarioVR.
What is CenarioVR?
CenarioVR is a powerful virtual reality software and authoring tool that is part of Trivantis suite. This SAS-based online authoring tool is used to create courses that are based on virtual reality simulations. It allows you to create engagement in real-life scenarios where learners can explore and participate in a captivating 360° virtual environment. It is designed to expand their ideas and promote learning, retention, and influence your organization to adopt a new approach to learning.
Basic Knowledge to Get Started with CenarioVR:
With the power of virtual reality, you can discover a new way of learning that helps engage and inspire learners. With its artificial intelligence, this uniquely designed tool can help produce a digital environment for learning with immersive situational simulations, using 360° videos and images.
- To get started, you need a 360° camera or an existing 3D video.
- Once the environment is recorded or the footage uploaded, you can edit or create the needed interactivity using CenarioVR’s built-in editor, with ease.
- The output is an impactful visual design that promotes effective learning using text, hotspots, 2D images, and videos to add and personalize your learning experience.
With the hotspots feature, you can add more engagement to the course. You can add links between scenes, play audio and videos, add questions, branching, and much more.
CenarioVR seamlessly works on any web-browser and Learning Management System (LMS), to deliver courses via HTML5, SCORM, xAPI, cmi5 and Android/iOS apps. CenarioVR’s built-in tracking helps you track, analyze, and measure learning and in a smart fashion, thereby improving efficiency and outcomes.
What are the Key Benefits of CenarioVR?
- Simulations can be accessed online and there is no need to download to the desktop
- Courses can be published to the Web and to Learning Management Systems
- Publishes mobile-compatible courses
- Measures real-time analytics and performance
- Allows you to assign privacy settings (private, public, or shared in groups)
CenarioVR: The Development Process to Create Courses
Like any other eLearning course development, to create scenarios in CenarioVR, you need to design the storyboard, with the proper structure and flow. As the learning environment is immersive, you need to focus on the learners and their situational spatial awareness, to minimize the use of text.
Once the design phase is completed, you need to gather assets such as 360° videos or images that are used in background scenes and other media and text, to incorporate in the scenario.
The First Look of the CenarioVR Interface:
There are two main parts of the CenarioVR interface that are to be explored:
- Dashboard
- Scenario Editor
Dashboard
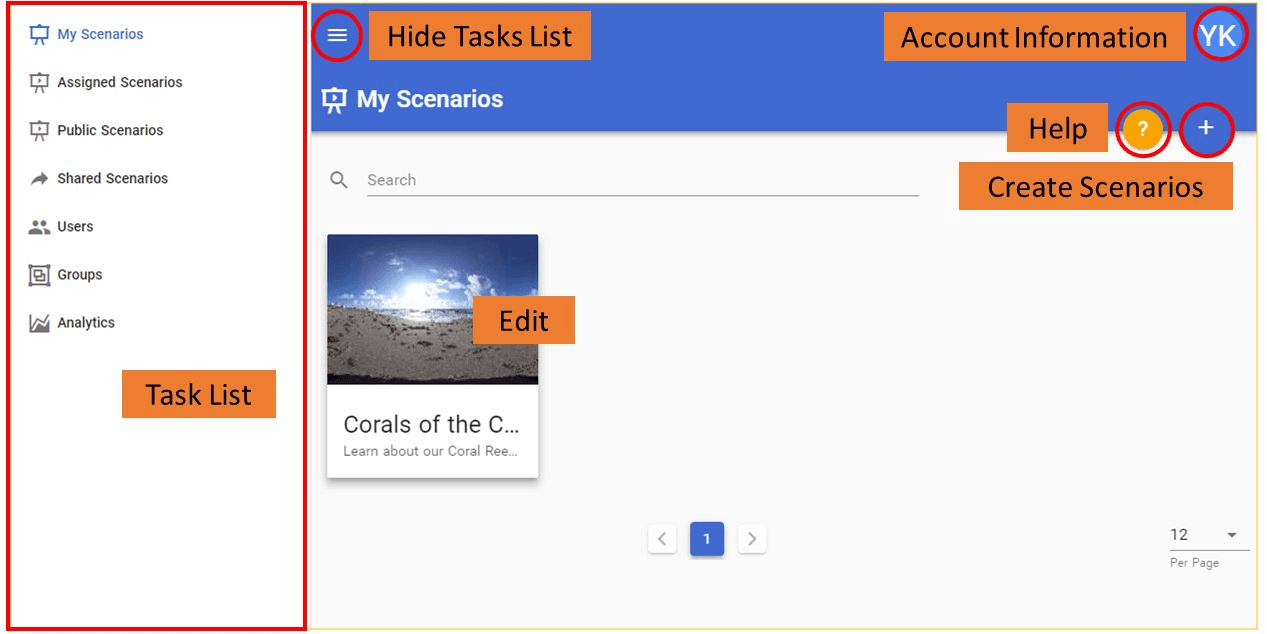
When you log in for the first time to CenarioVR, the tool offers a tour with step-by-step instructions to use the tool. Let’s take a quick look at CenarioVR’s dashboard.
Task List: On the left-hand side of the CenarioVR Dashboard, you will find the Task List that lets you manage tasks.
- My Scenarios: Allows you to create and share your own scenarios.
- Assigned Scenarios: Allows you to assign scenarios.
- Public Scenarios:Allows you to access the available free scenarios that are shared by others.
- Shared Scenarios: Allows you to view and share scenarios with others.
- Users: Allows you to view and manage the users within your teams.
- Groups: Allows you to manage user groups and configurations.
- Analytics: Allows you to track and monitor the activities of users.
Hide Task List: You can toggle between tasks to get the bigger view.
Account Information: This space holds the account information of all users.
Help: The one-stop place for all needed solutions (videos, articles, and news).
Create Scenarios: Allows you to create new scenarios or import from an existing list.
Scenario List: Allows you to select images to edit using the scenario editor.
Scenario Editor
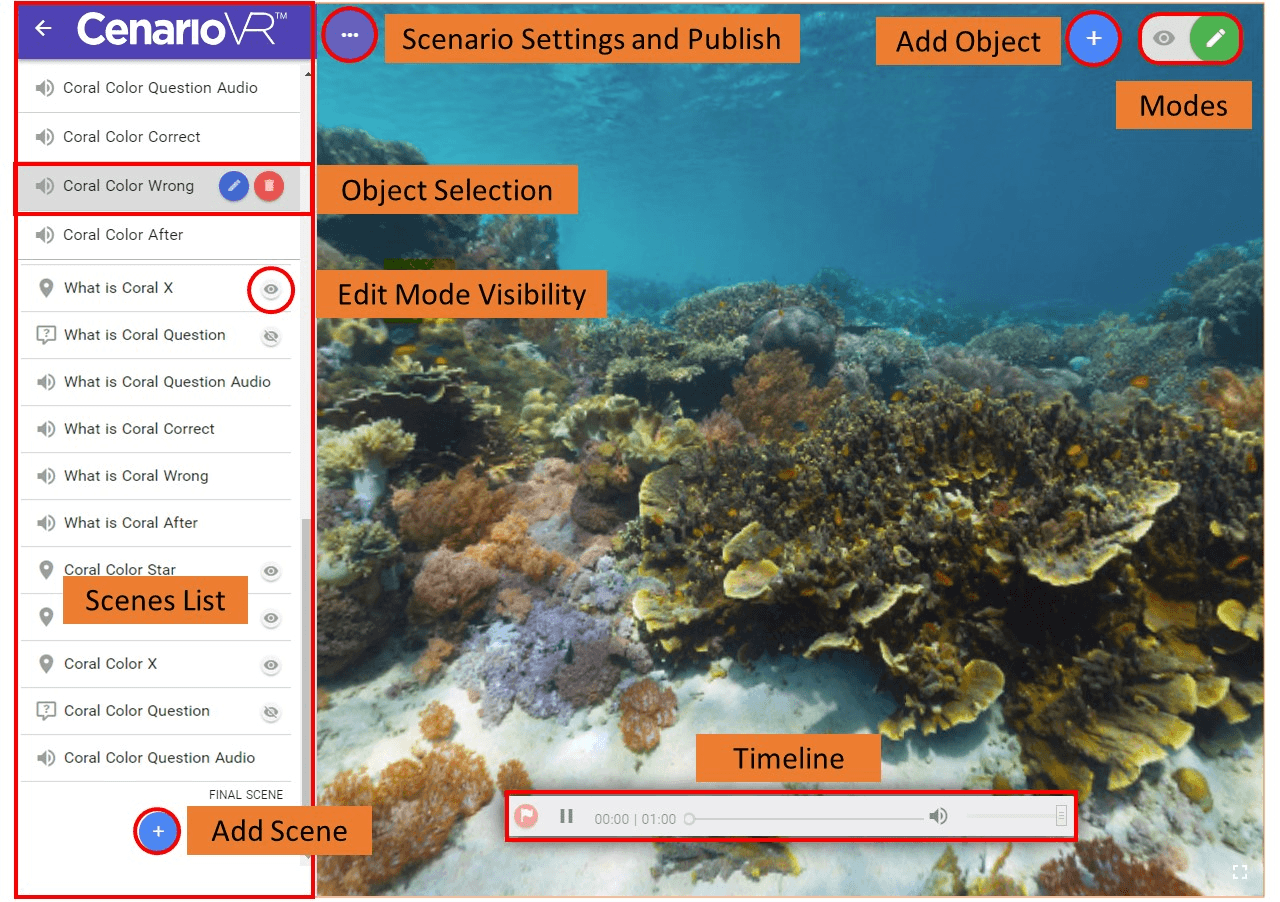
The scenario editor is a creative zone to build the learners’ experience. It is an effective learning scenario builder, where you can add scenes and interactivities that can be published and shared.

- Scenes’ List: This column on the left-hand side comprises all the interactivity features available in this tool. You can add 360 o videos or images to this column, for a better learner experience.
- Add Scene: Allows you to add new scene scenarios.
- Scenario Settings and Publish: Allows you to change the settings of the scenario before you publish.
- Timeline: Allows you to place timed actions for image and video scenes.
- Add Actions, Media, and Branching: Allows you to add interactive actions to the scene, such as display a question or play a video. You can also add images and audio and link them to other scenes.
- Modes: Allow you to preview the mode before you publish scenarios, to check how they work from the user’s viewpoint.
- Object Selection: Allows you to delete or modify an object within another object.
- Edit Mode Visibility: Allows to control the visibility.
The best way to understand the working of the CenarioVR is to try and test it for yourself. You can watch walkthrough videos that give you an overview and a better idea of the tool. This is a powerful tool to create courses with scenarios that impact your learning experience. In the coming days, we will share more on the features of the tool. Stay tuned and in the meanwhile, share your thoughts on the tool.
References:


![How to Enhance Learner Engagement in a VILT Session? [Video]](https://blog.commlabindia.com/hubfs/Imported_Blog_Media/vilt-ways-enhance-learner-engagement-video.jpg)
![The Beginner’s Guide to Adaptive Learning: 5 Questions to Consider [Infographic]](https://blog.commlabindia.com/hubfs/Imported_Blog_Media/adaptive-learning-beginner-guide-infographic.jpg)