Step-by-Step Process to Create Accessible Courses with Lectora 17

There is a misconception that developing online courses for physically challenged learners and employees is quite a difficult task. However, rapid authoring tools made it pretty easy, with their many built-in features. For this blog, let’s limit it to Lectora 17, for creating Section 508 compliant online courses.
1. Turn On the Web Accessibility Settings
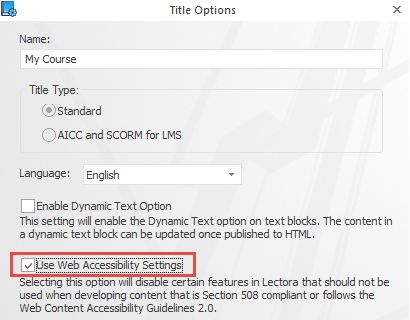
Before you begin to develop a course or design content for physically challenged learners, just turn on the Use Web Accessibility Settings in the Title Options dialog box in Lectora 17. This action will enable certain features that meet Section 508 standards.
Here are some changes you will experience after checking the box:
- Standard pop-ups open in a new window instead of ‘light-box style’ pop-ups. This change helps the screen reader recognize pop-up windows.
- ALT tags are enabled for images and buttons, to interpret and announce visual content.
- Video & audio players and skins are disabled as some media players are not accessible.
- Rollover video controllers are disabled as they need mouse operations.
- Set the reading order; language property for text blocks and some more accessibility-friendly options are enabled.
2. Select the Default Language for Titles & Other Text Blocks
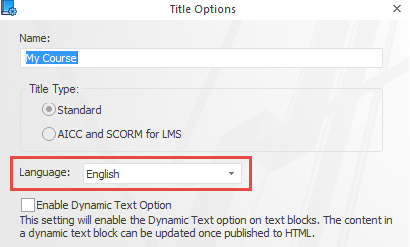
You can select the default language using the ‘Language’ drop-down menu in the Title Options dialog box. The language selected here will be your default language for the title. . The language in which you install Lectora 17 is the default language for Lectora, and then you can change it on a title by title basis using this method.
3. Keep the Layering Order Correct
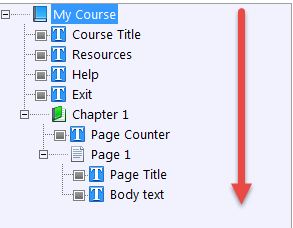
The Title Explorer in Lectora 17 controls the layering of objects on a course page, so that screen readers know the order and identify objects. An object at the top of the list will be read at the last and the object at the bottom of the list will be read first.
When you select the option ‘Always on Top’ for an object, it will be placed in the top-most layer of the page and the screen reader will identify it first.
4. Include Alt Tags for Images, Media, and All Interactive Elements
Lectora 17 provides you alternative text equivalents for each non-text element in the form of ALT tags for images, buttons, and other multimedia elements.
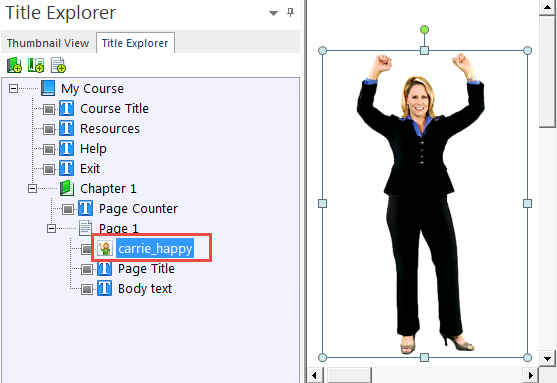
You can create ALT tags in the Title Explorer, based on the name of the object. This principle is applicable to layered, transparent buttons placed on pictures, to identify hotspots and rollovers.
You can turn off ALT tags for images that are decorative and convey no information. For example, this is applicable for company logos, background images, and shapes. Selecting the ‘Empty ALT Tag’ option will enable this property.

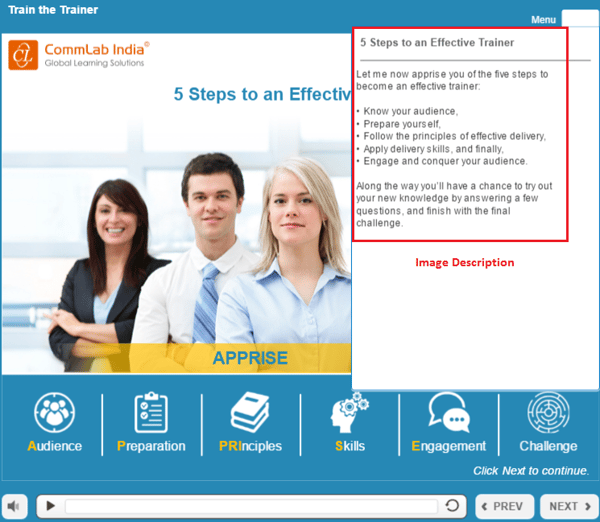
5. Add Explanations for Complex Graphics
You have a facility to provide longer descriptions in ALT tags, to explain complex graphics and charts. Instead of that, you can provide a textual description in Lectora 17.
Layer the description behind the graphic or chart, so that it won’t be visible and can be read by a screen reader.
Describing the image in words is another way of explaining complex graphics.
Another way is adding hyperlinks below the image and opening the description in a new tab/window.
6. Avoid Narrating Navigation Buttons
You have an option of skipping the narration for navigation buttons, in Lectora 17, to avoid repetition and facilitate learners to go to the main content directly. You can do it by creating the ‘skip to content’ link. Layering the ‘skip to content’ link in the Title Explorer before navigation will avoid repetitive narration of the Graphical User Interface (GUI) elements in each screen.

image courtesy: Lectora
7. Add Closed Captioning to Video and Audio Files
In Lectora 17, you can add closed captioning to video files in FLV and MP4 formats, and audio files in MP3, FLV, and M4A formats.
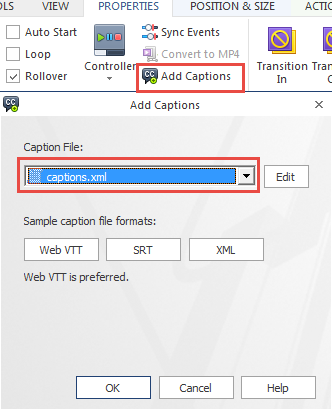
You can add close captioning by selecting the ‘Add Captions’ button in the audio/video properties menu. Importing the Web VTT file or opening a sample Web VTT file will help you get accurate details of the media in your course. You can create your own captions based on the sample/downloaded file. Lectora 17 also supports SRT and XML format for captions.
You can also include textual transcript on the screen for audio files. This can be displayed on the slides or you can give a link to a text file that can be opened in a new tab/window.
Designing and developing online courses, keeping accessibility in mind right from the beginning, will save much of your timelines and efforts. Testing the developed course by unplugging the mouse and only using the keyboard, evaluating with automated tools such as screen readers and accessibility evaluation tools, and giving the course to learners with disabilities will let you know the usability and impact.
Hope this checklist helps you develop highly engaging and accessible online learning courses.


