In my previous blog, we have seen how to convert your PowerPoint presentations to e-learning courses using the rapid authoring tool, Lectora Inspire. In this post, we will see how to do the same, using another widely used rapid authoring tool – Articulate Storyline. This tool has a PowerPoint-like user interface which makes it quite user-friendly compared to the previous tools we have discussed. Learning experts and SMEs familiar with PowerPoint can use it very easily. This feature of Storyline makes it a widely used tool for converting PowerPoint presentations into engaging and interactive e-learning courses.
Here are the steps:
Step 01: Open the PowerPoint deck you wish to convert to an e-learning course and delete unwanted slides such as a contextual role play, applicable in a classroom setting. Save the document in the desired location.
Step 02: Open Articulate Storyline installed on your computer.

Step 03: Click ‘Import PowerPoint’ which is the third option under the Create a new project section on the left.

Step 04: Browse through your drives to the location where the PowerPoint deck is saved. Select the file and click ‘Open’.

Step 05: The Insert Slides window appears with all selected slides. (As we have already deleted unwanted slides, you need not deselect slides here.) You can go ahead and click ‘Import’.

You will see that the slides of your PowerPoint file have been imported.
Step 06: The first thing you have to do now is delete a trigger from every slide. The trigger is shown in the screenshot below.

Why delete this trigger?
This trigger takes learners to the next slide automatically when the timeline of the current slide ends. You can retain it if you do not mind a self-running course without any interactivities.
Let’s now add an interactive slide to the course.
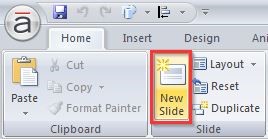
Step 07: To add an interactive slide, click the ‘New Slide’ button in the ‘Insert’ tab of the ribbon.
Step 08: The ‘Insert Slides’ window appears. From the Templates category, choose ‘Top interactions’ as the type of template.

Step 09: Select the interactivity template you want (depending on the type of content), and click ‘Import’.

All you have to do now is add content to the template. The functionality is pre-built.
Now that you have added the interactive slide, it’s time to add assessment slides.
Step 10: To add an assessment slide, click the ‘New Slide’ button in the ‘Insert’ tab of the ribbon.

Step 11: The ‘Insert Slides’ window appears. This time, from the Quizzing category, choose ‘Graded’ as the type of assessment template.

Step 12: From the graded assessments templates, select the type of assessment you want (again depending on the type of content you want to assess), and click ‘Insert’.

Step 13: Type the question and the options in the respective fields.

Step 14: Select the radio button of the correct option to designate it as the correct answer.

The assessment template comes with default feedback text. You can modify it if you want to. You also have other options on the top such as feedback display settings, score, number of attempts, inserting multimedia, etc.

Once you are done with the settings, click Save & Close.
You can add as many assessment slides as you want. You can also add a result slide to display the final score to the learners.
Step 15: To add a result slide, click the ‘New Slide’ button in the ‘Insert’ tab of the ribbon.

Step 16: From Quizzing templates, select ‘Result Slides’.

Step 17: Select ‘Graded Result Slide’, and click ‘Insert’.

Step 18: The ‘Result Slide Properties’ window appears. From the ‘Results’ category, select the question you want the result slide to display the score for; set the Passing score; and enable a timer if needed.

Step 19: Choose the features you want your result slide to offer, from the Options.

Click OK once you are done with the settings. You can always change the look and feel of the slides.
Now that you have added all the elements you need to your e-learning course, it’s time to review the course for functionality, design, and other issues.
Step 20: To preview the course, click ‘Preview’ in the ‘Home’ tab of the ribbon.

Step 21: Once the review is done and issues, if any, are addressed, you can go ahead and publish the course. To publish the course, click ‘Publish’ in the ‘Home’ tab of the ribbon.

Step 22: Choose the format you want to publish to and enter the ‘Title’, ‘Description’, and ‘Folder’ path.

Step 23: Configure other settings as per your requirements and click ‘Publish’.
That’s it! Simple, isn’t it? Your PowerPoint presentation has been successfully converted to an interactive and engaging e-learning course. It is now ready to be uploaded to the LMS and delivered to your learners.
Apart from these simple steps, you can always add a few videos or record your own narration to enhance your e-learning course. So, when are you converting your first PowerPoint presentation into an engaging and interactive e-learning course? We would love to hear from you in the Comments section.