Recently, we received a client requirement to develop simulations in Adobe Captivate 9. Normally, we start the simulation and capture the screens by clicking onscreen. This automatically generates screens, click boxes, callouts, and text entry boxes.
But our team decided to use characters, high-end visual elements and develop scenario-based simulations.
So, in this case couldn’t use the default simulation option because the screen size, background, text entry boxes, and callouts were to be different and had to be customized.
Have a look at the screenshot below to view what we had in mind.

In this blog, I will detail the steps to create customized simulations with customized text entry boxes taking the Microsoft Outlook to send an invite for a meeting.
Capture all the screenshots using the Print Screen button.
Adjust the screenshots according to your design and preferred size in Photoshop (software) and export the images in .jpeg format.
Insert the screens in Adobe Captivate using the shortcut key Shift + Ctrl + M or by clicking the Media button from the Menu.

Add Click Boxes wherever required using the shortcut key Shift + Ctrl + K or by clicking the Interactions button from the Menu.

If you select the Click Box, by default it will display the Success, Failure, and Hint captions. We need to remove these display captions from the Properties panel because instead of the default display captions, we will be using our own feedback.
So in order to show the feedback, go to Action panel in Properties, wherein Onsuccess, you can select Go to the next slide or previous slide.

Uncheck all default Display captions and check the hand cursor if required. We need a Text entry box to type the mail id or names wherever required.
Insert a Text Entry Box using the shortcut key Shift+Ctrl+T or by selecting Text Entry Box from the Menu.

Here again, we are not using the default text entry box because on clicking the Submit button, it jumps to next slide even though learner does not enter any text in the field.
Our requirement is that the learner needs to enter text and then click the Submit button to move forward; learners should not move forward unless they enter text.
For this, we need to customize the text entry box using variables, now let’s see how to do this.
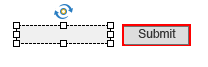
Insert a Text Entry Box and delete the Submit button.
Select the text entry box and delete the shortcut from the Action panel as we don’t require any keyboard shortcuts in this simulation.

If you open the Style panel, you will be able to see these options:
- Retain Text – displays previously entered text
- Show Text Box Frame – displays a rectangle around the box
- Password Field – display dots instead of alphabets
- Validate User Input – allows you to enter (assign) the correct answer
Whatever you enter in the text field will be considered the user’s final answer. So uncheck all options that are not required.
Click the “X” mark in the variable column and create a new variable.


Since we deleted the Submit button, we will create a new button with the help of smart shapes.
Draw a rectangle and convert the smart shape to a button by checking the ‘Use as Button’ option.


Now we will assign a Condition action to the button.
In the Action panel, go to Execute Advance Action.
From the Advanced Actions window, select Conditional Actions from the Action Type option.
For Correct Feedback
In the IF condition, set the variable you renamed (slide3) equal to the literal correct answer (Mail Id or correct name).
In Actions, if the above IF condition is true, display the correct feedback by jumping to slide 5 which contains the correct feedback.

For Incorrect Feedback
Duplicate the correct IF condition and rename it to incorrect.
Change the IF condition of the same variable name (slide3) to not equal to the correct text.
In Actions, we need to show the incorrect feedback, so select Jump to Slide 6 which contains the incorrect feedback.

Save the action and assign to the button. Preview and check the functionality.
Finally, publish the simulation.
Check out how the simulation works here.
This is how simulations can be customized in Adobe Captivate 9. Have other tips? Do share with us.