Use of Simulations for Effective Software Training

With the passing generations software applications have evolved drastically. To survive in this competitive world organizations constantly need to keep up with these upgraded technologies so as to be a step ahead from their competitors. This can be possible when organizations provide software training to their employees and give them an idea on how to use the software.
The traditional training method (classroom training) is not a viable option for software training. Because, for that we first need to hire a software expert and then bring all employees together at the same time to attend the session which is a difficult task. And even after this training, employees will gain just theoritical knowledge on the usage of the tool. They can only put it into action when they actually start working on the software which is quite risky.
So what is the ideal solution to train employees on a software? It would be e-learning. We can create simulations that show the step-by-step process of using the software and also allow the learners to try it in a virtual environment. This is possible using the various rapid authoring tools such as Captivate, Camtasia etc. Depending on the budget and the project need, we can choose the tool that serves the best. The course, once created can be accessed by the authorized learner anywhere and at anytime without compromising with his work.
Let us now see three easy steps in simulations that would help a learner understand the software in a better way.
Step 1: Watch
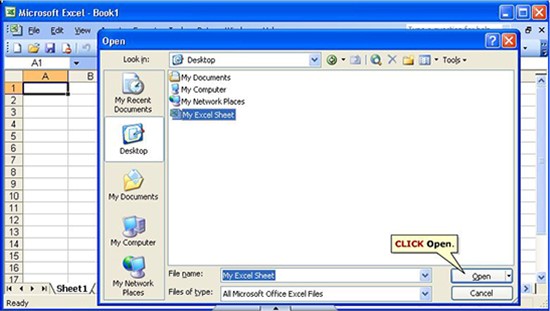
The first step is to show the learner how the tool works. For this, we first need to record the step-by-step actions that you need to perform in the tool with the help of a selected authoring tool. For instance, if you want to teach the learner how to open an Excel sheet, then you first need to record each step of it and then embed it in a video format in the course where the learner watches all the steps.

Step 2: Try
I am sure most of you would agree with me that we remember more when we do than when we see. So the next step is to ask the learner try what he saw. It is certain that we don’t remember all the steps we see. For this reason, in the Try step we can add hints on what the learner has to click next, this would help him understand better. As discussed in the above example, in the first step we simply show all the steps, and in this stage we give the learner certain hints such as “Click File” etc. in a pop-up to help him do the next actions.

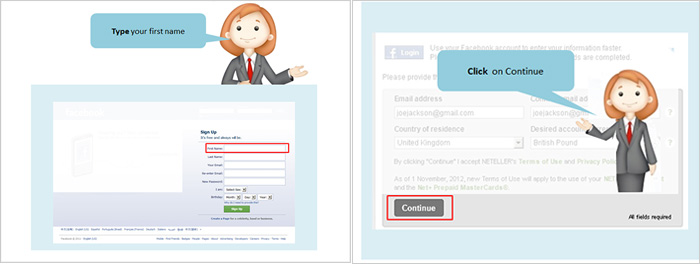
To engage the learner and guide him to the next steps we can also make use of characters who pops up each time to prompt the learner on what to do next. Have a look at the screenshot below for a better idea.

Step 3: Do
The third and last step is to allow the learner do by himself what he has learnt. The major benefit of this step is that since the learner practices in a virtual environment, even if he makes a mistake it would not disrupt the actual software. Continuing the above example of opening an Excel sheet, in this step the learner will not be shown any onscreen hints about the actions that he needs to perform. Instead, after three unsuccessful trials, he would be shown the actual actions that he had to perform again. This would help the learner understand cearly.

The Watch-Try-Do method makes it simple and easy for a learner to understand and demonstrate the steps of using a software. I hope you find this blog informative. Please do share your thoughts on the same.


![What Does iSpring Space Offer for Rapid eLearning Authoring? [Slideshare]](https://blog.commlabindia.com/hubfs/Imported_Blog_Media/eLearning-authoring-iSpring-space-slideshare.jpg)
![4 Trending Technologies that’ll Shape the L&D World in 2017 [Infographic]](https://blog.commlabindia.com/hubfs/Imported_Blog_Media/l-and-d-trends-2017-infographic-2.jpg)