7 Easy Steps to Create a Single SCORM Package for Multiple Courses

As discussed in my previous blogs eLearning courses should be made compatible to SCORM standards, if you wish to track your eLearning activities and there are some key steps to do that. But did you know that this will no more work if you try to blend multiple courses into a single course to address a specific requirement?
Many a times we create courses on the same subject, separately and decide to combine them later to make a curriculum. Sometimes, we develop a catalogue of courses/modules with only one set of final assessment that needs to be tracked. So the modules/courses need to be bundled and made as a single SCORM package. We have helped several clients in this aspect. Let me now share the process with you all.
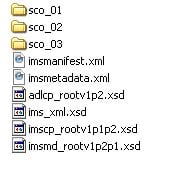
1. Collect all the packages that you want to merge. Unzip the packages and create a folder for each package and make sure that each of these has an imsmanifest.xml file.
2. Go through each imsmanifest.xml file and copy all the index file names and the course assets.
3. Then create a parent/root folder and put all the SCORM 1.2 packages that you have merged into this root folder.
4. As per the SCORM1.2 package standards, you have to add 5 standard files to the root folder out of which 4 of them should be.xsd files, which do not need alteration. The last one should be .imsmanifest.xml which needs alteration to suit the package.
 5. Now you need to alter the imsmanifest.xml file of the root file to point to the sub-files and it should be altered in the organization as well as the item tag. You also need to make sure that there is a row for all the sub folders.
6. Here is a sample for your reference that demonstrates a course generated from 3 different packages. In these packages , the below details needs to be changed:
- “Identifier” and “Title” should mention the course title. In this example below, it is “Multi sco sample”.
- Now the next step is to build an “item identifier” for every package that you have already unzipped. Change the course title to represent all the course components. The title will be displayed in the navigation tab. So make sure that the title describes the course or go to each sub folder, copy the course title and paste the same. In this example, “Command Delta” is the first title tag that must be modified.
- Define a “resource identifier” to all the subfolders individually. Change the subject that is given in quotes after “href” to match the file path and the index file name. And the index file will be specified in each SCO’s manifest file.
Note: Ensure that the item identifiers given are specific and they are similar to the other equivalent resource identifiers.
<?xml version=”1.0″ standalone=”no”?>
<manifest identifier=”PK-MANIFEST” version=”1.0″
xmlns=”http://www.imsproject.org/xsd/imscp_rootv1p1p2″
xmlns:adlcp=”http://www.adlnet.org/xsd/adlcp_rootv1p2″
xmlns:xsi=”http://www.w3.org/2001/XMLSchema-instance”
xsi:schemaLocation=”http://www.imsproject.org/xsd/imscp_rootv1p1p2 imscp_rootv1p1p2.xsd http://www.imsglobal.org/xsd/imsmd_rootv1p2p1 imsmd_rootv1p2p1.xsd http://www.adlnet.org/xsd/adlcp_rootv1p2 adlcp_rootv1p2.xsd” >
<metadata>
<schema>ADL SCORM</schema>
<schemaversion>1.2</schemaversion>
<adlcp:location>imsmetadata.xml</adlcp:location>
</metadata>
<organizations default=”TOC1″>
<organization identifier=”TOC1″ structure=”hierarchical”>
<title>Multi sco sample</title>
<item identifier=”I_SCO0″ identifierref=”SCO0″ isvisible=”true”>
<title>Command Delta</title>
<adlcp:masteryscore>80</adlcp:masteryscore>
</item>
<item identifier=”I_SCO1″ identifierref=”SCO1″ isvisible=”true”>
<title>SAP Overview and Basic Navigation</title>
<adlcp:prerequisites type=”aicc_script”>I_SCO0</adlcp:prerequisites>
<adlcp:masteryscore>80</adlcp:masteryscore>
</item>
<item identifier=”I_SCO2″ identifierref=”SCO2″ isvisible=”true”>
<title>JWS Apex Delta</title>
<adlcp:prerequisites type=”aicc_script”>I_SCO1</adlcp:prerequisites>
<adlcp:masteryscore>80</adlcp:masteryscore>
</item>
</organization>
</organizations>
<resources>
<resource identifier=”SCO0″ type=”webcontent” adlcp:scormtype=”sco” href=”sco_01/module/start.html”>
<file href=”sco_01/module/start.html”/>
</resource>
<resource identifier=”SCO1″ type=”webcontent” adlcp:scormtype=”sco” href=”sco_02/module/start.html”>
<file href=”sco_02/module/start.html”/>
</resource>
<resource identifier=”SCO2″ type=”webcontent” adlcp:scormtype=”sco” href=”sco_03/module/start.html”>
<file href=”sco_03/module/start.html”/>
</resource>
</resources>
</manifest>
7. Finally, zip the root folder including the sub files and check the course in the testing system. If everything has gone right, you will see all the links in the left hand navigation of the eLearning course. Navigate through the complete course to ensure that the course is complete.
So this is how you can bundle your multiple SCORM compliant courses to a single SCORM package. Hope it was informative. Do share if you have any similar experience.


