How to Use Rulers in Adobe Captivate 9 Authoring Tool

Adobe Captivate 9 is the most widely used rapid authoring tool and one of most popular eLearning tools. The tool is known for its capability to develop software simulations and responsive eLearning courses.
In this blog, I am going to explain about rulers and guide.
Why do we use Rulers in courses?
In Captivate 9, Rulers assist in placing objects precisely, measuring them in pixels or percentage. With the help of rulers, developer can align the objects in the slides easliy, and it also saves the time, primarily in the responsive project.
How to use Rulers in Captivate 9?
Here’s a quick tip on how you can Add, Hide, Clear, Snap, and lock guides with the help of a ruler.
To show the rulers in your course, you first need to:
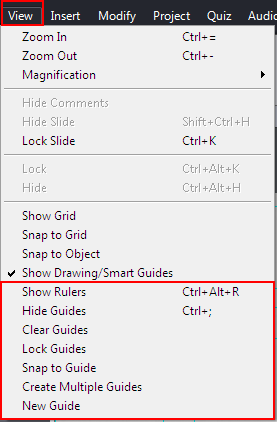
Click on View menu and select Show Rulers (Ctrl+Alt+R) from the list. Shown below is the screenshot.

Shown below is the screenshot, where you can see the ruler in the working area (screen).

As shown in the above screenshot, rulers are in pixels.
1. Adding the Guide
There are various ways to add guides in your slides; it can be in horizontal or vertical guide/line. Let’s see five different ways to add guides.
- You can click on the ruler and drag and drop it in the working area as per your requirement.
- You can add the guide by double-clicking on the exact pixel area (value) on the ruler.
- You can also add guide by entering the pixel value for the exact position. Then, go to View menu and select New Guide. New Guide window appears, where you can add exact positioning of the guide by entering the pixel value for horizontal or vertical guide.
- You can also add new guide beside the existing guide by 20 pixels, hover the mouse cursor on the existing guide and Right-click, where you can see Add New Guide. Upon clicking on add new guide, it will automatically add guide by 20 pixels on the right or bottom.
- You can also add multiple guides at once on-screen. For this, you can go to the View menu and select Create Multiple Guides. Create Multiple Guides window appears, where you can enter the details of rows or columns with margin and click the OK button.
In 100 percent view, you can see 0, 100, 200 pixels. If you zoom in your screen, you can also see the 10, 20 and 30 pixels for perfect alignment.
2. Deleting the Guide
- You can delete the guide by hovering over the existing guide with the mouse cursor and right-click on a guide and select Delete Guide.
- You can also clear all guides at once, go to the View menu and select Clear Guides from the list.
- You can also select the guide and drag over the ruler, and the guide will disappear.
3. Locking the Guide
You can also move the guide easily by selecting the guide with the mouse cursor and drag anywhere you want on the screen. An easy was to lock the added guides to add exact positing of the objects, go to the View menu and select Lock guides. You can now align your objects or add any object according to guide line.
4. Snapping the Guide
Snapping the Guide helps in placing the object in the right position, and it automatically snaps the object by dragging the object over the guides.
5. Hiding the Guide
You can also hide the guide after adjusting all the objects in your slide. Go to the View menu and select Hide Guide from the list.
6. How can we change color of the Guide?
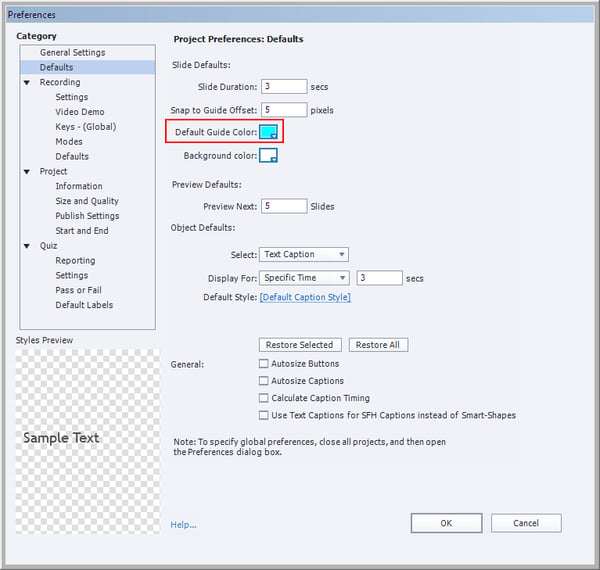
You can also change the color of the guide by clicking the Edit menu and select Preferences from the list. A preferences window appears and selects default options, where you can see the Default Guide Color option.
Double-click on the pallet and change into any color of your choice. Shown below is the screenshot.

Similar options will be available in a Responsive project, which functions the same as a non-responsive project. The only additional feature we have in a responsive project is the measurements of rulers in Pixels and Percentage.


![Delivering Online Product Training? 6 Tips You Cannot Afford to Miss [Infographic]](https://blog.commlabindia.com/hubfs/Imported_Blog_Media/online-product-training-tips-infographic-2.jpg)
![Tips to Evaluate the Effectiveness of Your Online Courses [Infographic]](https://blog.commlabindia.com/hubfs/Imported_Blog_Media/online-course-creation-2-1.jpg)
![5 Free Tools to Edit Training Videos [Infographic]](https://blog.commlabindia.com/hubfs/Imported_Blog_Media/videos.jpg)