

PhoneGap is an open source mobile application platform that enables you to create mobile applications using HTML and JavaScript. Here I would like to share how to setup phone gap and create a sample android app.
Before setting up phone gap you should have the following software.
- Java(jdk-7u2-windows-x64.exe) – Download here
- Eclipse(juno) – Download here
- Android-sdk_r22.0.5-windows – Download here
You have to install java , Eclipse IDE in your system, and run android-sdk_r22.0.5-windows\android-sdk-windows\SDK Manager.exe
Now open the eclipse folder and run eclipse.exe; then eclipse IDE screen appears.
Step 1.
On the eclipse IDE screen go to Help and select “Install New Software” and click on it.

Step 2.
Click on “Install New Software”; the following screen appears.

Step 3.
Click on the “Add “ button and give the Name: ADT Plugin and Location: https://dl-ssl.google.com/android/eclipse/

Step 4.
On clicking the “OK” button, the following screen appears; select the check box for Developer Tools and from it and clickNext.

Step 5.
In the next window, you will see a list of the tools to be downloaded, and then click Next.

Step 6.
Select read and accept the license agreements; then click Finish.


When the installation is completed, restart Eclipse.
Once the ADT plugin is installed, you need to install the Android platform and other components. To do that, go to the menu option window->Android AVD manager and select the platform and API level.

Download the required version of PhoneGap; here you can select Phone Gap 2.0.0.
Android sample app creation:
1. Go to file > New and select “Android Application Project”

2. Enter the Application name, project Name and package Name.

3. Click on the Next button and you’ll get the configure project window.

4. Then Configure App Launcher Icon
![]()
5. Create Activity type


6. Now Sample App files are created.
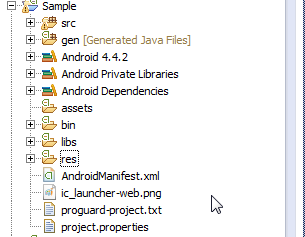
7. Then create two new directories in the root directory of your project:
/libs
assets/www
Copy cordova-2.0.0.js from your phonegap-phonegap-2.0.0-0-g2dbbdab(2)\phonegap-phonegap-2dbbdab\lib\android to assets/www
Copy cordova-2.0.0.jar from your phonegap-phonegap-2.0.0-0-g2dbbdab(2)\phonegap-phonegap-2dbbdab\lib\android to /libs
Copy the xml folder from your phonegap-phonegap-2.0.0-0-g2dbbdab(2)\phonegap-phonegap-2dbbdab\lib\android to /res
Now verify that cordova-2.0.0.jar is listed in the Build Path for your project.Just right click on the /libs folder and go to BuildPaths.

8. Click on Configure Build Path… and see in the Libraries tab; add cordova-2.0.0.jar to the project. You need to refresh (F5) the project once again.

9. Go to the src folder and edit the mainActivity.java file
Except package name (package com.commlab.sample;) remove the existing code and paste the below code .
import android.os.Bundle;
import android.app.Activity;
import org.apache.cordova.*;
public class MainActivity extends DroidGap{
@Override
public void onCreate(Bundle savedInstanceState){
super.onCreate(savedInstanceState);
super.loadUrl(“file:///android_asset/www/index.html”);
}
}
10. Right click on AndroidManifest.xml and select Open With > Text Editor and paste the following permissions between the <uses-sdk…/> and <application…/> tags.
<supports-screens
android:largeScreens=”true”
android:normalScreens=”true”
android:smallScreens=”true”
android:resizeable=”true”
android:anyDensity=”true” />
<uses-permission android:name=”android.permission.VIBRATE” />
<uses-permission android:name=”android.permission.ACCESS_COARSE_LOCATION” />
<uses-permission android:name=”android.permission.ACCESS_FINE_LOCATION” />
<uses-permission android:name=”android.permission.ACCESS_LOCATION_EXTRA_COMMANDS” />
<uses-permission android:name=”android.permission.READ_PHONE_STATE” />
<uses-permission android:name=”android.permission.INTERNET” />
<uses-permission android:name=”android.permission.RECEIVE_SMS” />
<uses-permission android:name=”android.permission.RECORD_AUDIO” />
<uses-permission android:name=”android.permission.MODIFY_AUDIO_SETTINGS” />
<uses-permission android:name=”android.permission.READ_CONTACTS” />
<uses-permission android:name=”android.permission.WRITE_CONTACTS” />
<uses-permission android:name=”android.permission.WRITE_EXTERNAL_STORAGE” />
<uses-permission android:name=”android.permission.ACCESS_NETWORK_STATE” />
<uses-permission android:name=”android.permission.GET_ACCOUNTS” />
<uses-permission android:name=”android.permission.BROADCAST_STICKY” />
11. For Support orientation changes, paste the following inside the <activity> tag.
android:configChanges=”orientation|keyboardHidden|keyboard|screenSize|locale”
12. The final AndroidManifest.xml should look like
<?xml version=”1.0″ encoding=”utf-8″?>
<manifest xmlns:android=”http://schemas.android.com/apk/res/android”
package=”com.commlab.sample”
android:versionCode=”1″
android:versionName=”1.0″ >
<uses-sdk
android:minSdkVersion=”8″
android:targetSdkVersion=”8″ />
<supports-screens
android:largeScreens=”true”
android:normalScreens=”true”
android:smallScreens=”true”
android:resizeable=”true”
android:anyDensity=”true” />
<uses-permission android:name=”android.permission.VIBRATE” />
<uses-permission android:name=”android.permission.ACCESS_COARSE_LOCATION” />
<uses-permission android:name=”android.permission.ACCESS_FINE_LOCATION” />
<uses-permission android:name=”android.permission.ACCESS_LOCATION_EXTRA_COMMANDS” />
<uses-permission android:name=”android.permission.READ_PHONE_STATE” />
<uses-permission android:name=”android.permission.INTERNET” />
<uses-permission android:name=”android.permission.RECEIVE_SMS” />
<uses-permission android:name=”android.permission.RECORD_AUDIO” />
<uses-permission android:name=”android.permission.MODIFY_AUDIO_SETTINGS” />
<uses-permission android:name=”android.permission.READ_CONTACTS” />
<uses-permission android:name=”android.permission.WRITE_CONTACTS” />
<uses-permission android:name=”android.permission.WRITE_EXTERNAL_STORAGE” />
<uses-permission android:name=”android.permission.ACCESS_NETWORK_STATE” />
<uses-permission android:name=”android.permission.GET_ACCOUNTS” />
<uses-permission android:name=”android.permission.BROADCAST_STICKY” />
<application
android:allowBackup=”true”
android:icon=”@drawable/ic_launcher”
android:label=”@string/app_name”
android:theme=”@style/AppTheme” >
<activity
android:name=”com.commlab.sample.MainActivity”
android:label=”@string/app_name”
android:configChanges=”orientation|keyboardHidden” >
<intent-filter>
<action android:name=”android.intent.action.MAIN” />
<category android:name=”android.intent.category.LAUNCHER” />
</intent-filter>
</activity>
</application>
</manifest>
13.Create index.html in the assets/www directory and paste the following code:
<!DOCTYPE HTML>
<html>
<head>
<title>Sample</title>
<script type=”text/javascript” charset=”utf-8″ src=”cordova-2.0.0.js”></script>
</head>
<body>
<h1>Android Sample App</h1>
</body>
</html>
14. Right click on the project folder and go to Run As > Android Application; you will get the output on Simulator.


15. For the installation file, find the sample.apk inside the bin folder.
Now phone gap app is ready to install in your device.


![3 Benefits of Gamifying Induction Training Programs [Infographic]](https://blog.commlabindia.com/hubfs/Imported_Blog_Media/gamify-induction-training-programs-infographic.jpg)