This blog explains how to develop online training that is Section 508 compliant using Articulate 360.

You can develop online learning courses that are compliant with Section 508 accessibility guidelines, using Articulate 360. Closed captions, tables, alternative text, and custom tab order are some important accessibility features available in Articulate 360. Here is how we can leverage them to develop accessible eLearning.
1. Import Closed Captions for Videos & Audio Narration
You have two options to import captions in Articulate 360:
- Import captions simultaneously, while importing audio and video files
- Import captions separately, after adding audio narration and videos to your online training course
Source: Import Closed Captions for Videos & Audio
Importing both captions and media at one go speeds up course development. Name the caption files with the same names as the AV files and save in the same folder, this will enable Articulate 360 to automatically import captions when you import media files.
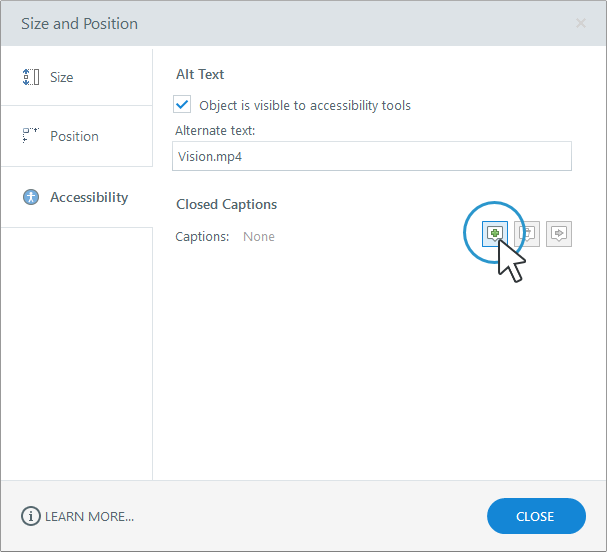
If you don’t have the caption files at the time of uploading the media files, you can add them later, by going to the Options tab and selecting the plus sign (+) beside Captions.

In Articulate 360, by default, Captions are turned off, but can be turned on by adjusting the variable ‘Player Display Captions’ to ‘True’ when you open the first slide. You will find other options as well to change font, colors, and effects of captions.
2. Use Tables to Structure Text for Screen Readers
Now tables can be used to organize text in Articulate 360. They communicate how content is arranged for screen readers. This provides a context for learners with disabilities.
Go to the Insert tab and click Table to create a table with the number of rows and columns you want.
Enter text in each cell, or use text files to import data to the table. You can resize, and format (color/font/alignment) the table as usual.
You can import tables from PowerPoint with text and formatting; you can make changes by editing, after importing. You can also copy and paste tables from web pages, and Excel sheets.
As tables are important accessibility features, to communicate with screen readers on how content is organized, add alternate text and tab order to the tables and cells.
3. Add Alt Text to Slide Objects & Customize the Tab Order
To add alternate text to slide objects, go to the Home tab and click Tab Order. You will have to add descriptive alternate text to each slide object you want screen readers to read aloud for your learners.

Source: Customize Tab Order
To hide objects that don’t convey any meaning from screen readers, select them in the Tab Order window and click the bin icon. You can also change the tab order for slide objects, to help learners understand the context with the help of screen readers. For that, you need to mark the radio button at the top of the Tab Order window, to create a custom tab order, then use the Up and Down arrows to rearrange slide objects.
Save the changes after providing alt text to all slide objects and customizing the tab order.
4. Customize Text Labels for Screen Readers
Some Player text labels provide additional instructions to learners with screen readers.
For example, you can give a message to skip navigation buttons after hitting tab on the last object of the slide.

Source: Customize Text Labels for Screen Readers
To do this, go to the Home tab and click Player; in the properties window select Text Labels. First, select your language, then scroll down the list of text labels to find ‘Skip navigation screen reader instructions’. In the custom text field, you can enter instructions such as ‘to skip navigation and go to the next slide, press Enter or Spacebar.
5. Change the Player Font Size

Source: Change Player Font Size
Increasing the font size of Player elements will help visually-impaired learners. For that, go to the Home tab and click Player. In the Player properties window, increase the Player font size to the desired percentage, from 75% to 200%. You can also change Player colors and effects in Articulate 360.
In fact, all these accessibility friendly/Section 508 compliant options except tables are now available in the latest and third version of Articulate Storyline. You can try that too!